Housekeeping and Setup
For most users data usage often boils down to the software you use to analyze and manipulate images and how you are going to work with them. So here are going to do some housekeeping and setup depending on which tools and setup you are most comfortable with
1) Python Setup and libraries
Depending on what type of usage you are interested and the libraries you want to use you can find Python installations here. And here are some of the libraries you can use with that including but not limited to GDAL, Scipy,Numpy, Matplotlib, Pandas, Fiona and Shapely. This list is not exhaustive and include anything else you might need like scikit or learn opencv All of Pypi is your oyster
for most systems you can copy and paste this if you have pip on your native command line or terminal
pip install numpy scipy fiona shapely matplotlib pandasFor Ubuntu and Debian users this might work better and I borrowed it from the installation page at Scipy
sudo apt-get install python-numpy python-scipy python-matplotlib python-pandasNote that GDAL involves a few additional steps for installation on windows machines You can read more about it here
Two other tools or setups which might be handy include
virtualenv
virtualenv allows the user to create and manage seperate package installations fo multiple projects. Think of this as your new project can have its own set of user libraries seperated from the native python libraries. It allows you to create isolated environments for projects and install packages into that virtual isolated environments.
A simple installation would be
pip install virtualenvYou can get more details about installation on different operation systems and activation of this environment by reading their docs.
jupyter notebook
The jupyter hub defined jupyter notebook as
The Jupyter Notebook is an open-source web application that allows you to create
and share documents that contain live code, equations, visualizations and narrative text.
A lot of the tool chains and processes have been already built into jupyter notebooks for you to use,
2) Planet and Google Earth Engine(GEE) Command Line Interface(CLI) Setup
You planet account comes with a brand new CLI and it allows you to perfrom basic functions such as search for ID[s] and for images in a specific location, export all image footprint in your area of interest and so on. Installation is pretty simple
pip install planetYou installation steps from earlier means you have managed to not only create the Google Earth Engine account but also installed its client. Incase you have missed it go to their main reference page for installation of their python client. Since you can consume Earth Engine using both Javascript(in browser) and Python(locally).
3) Location to GEE datasets
From Guillermo E. Ponce-Campos's earlier presentation, you saw the application of some datasets within Google Earth Engine. If the data is maintained as open access then you can add any of the datasets by simply adding the following lines first
var neon_srer_hs = ee.ImageCollection("users/gponce/usda_ars/image_collections/neon_srer_2017_hs")
var rgb10cm = ee.ImageCollection("users/gponce/usda_ars/image_collections/neon_srer_2017_rgb")
var ltar_sites = ee.FeatureCollection("users/gponce/usda_ars/shapefiles/LTAR/ltar_boundaries")

//get size of collection
print(neon_sres_hs.size())
for those using python API you can still access a collection
import ee
ee.Initialize()
neon_sres_hs=ee.ImageCollection("users/gponce/usda_ars/image_collections/neon_srer_2017_hs")

##you can even check how many images does the collection have
print(neon_sres_hs.size().getInfo())
4) Adding additional Images
For a minute there imagine you want to work with more data apart from the few areas we talked about, the Education and Research account gives you 10,000 square kilometer and you can then upload it into GEE.
For the simplest users getting images into GEE begins with the Image upload tool located inside GEE. Once you have added the filename you can edit additional metadata such as start time, cloud cover information if you have that from the metadata file among other things. This tool does not have a way for you to ingest any metadata automatically so it has to be fed manually.
The image name is automatically filled in with the filename that you select when uploading.
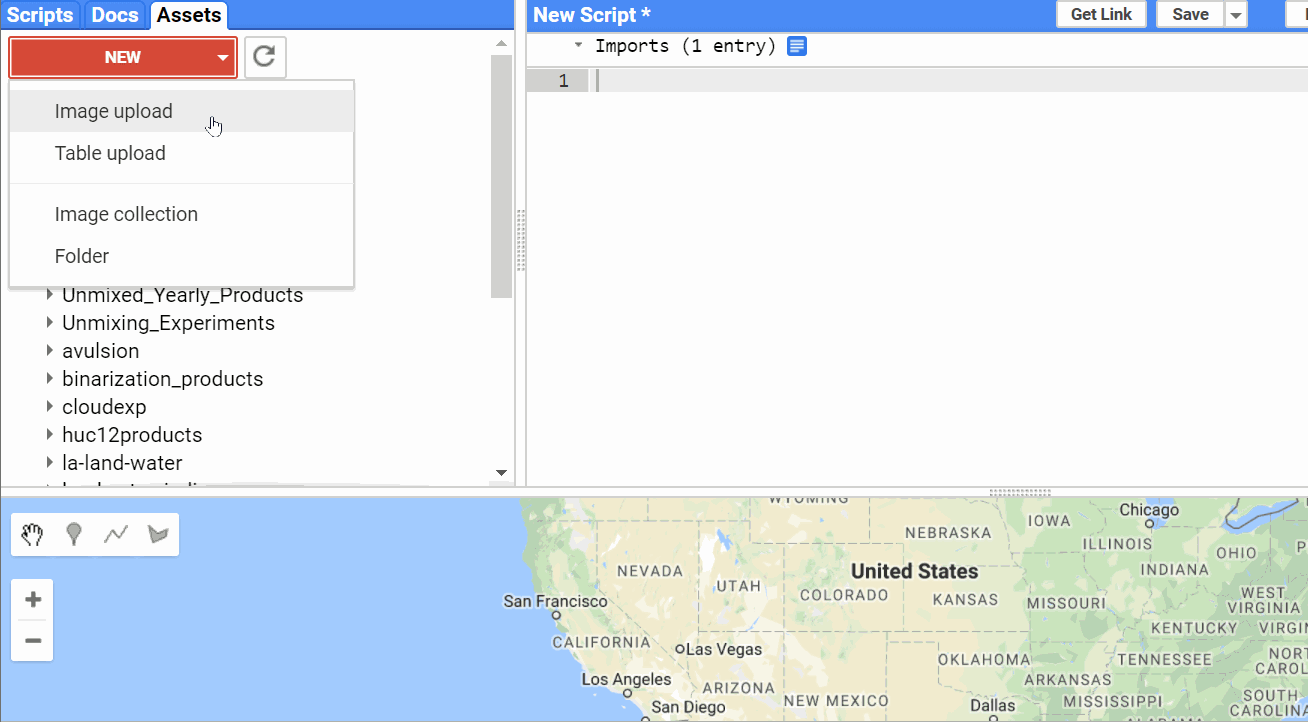
Note you cannot select more than one image and upload as a single image if they overlap each other. To handle which we have the concept of image collections. Where you can upload many images. To import images into collections, you have to either import them manually as images first and then copy them into the collection one by one or for now use an external tool to help such as using the Google Earth Engine CLI.
For now you can use the tool I made to batch upload collections along with their metadata into Google Earth Engine. You can install this by simply typing
pip install ppipeYou can read about the tool, it's setup and it's operation at this Planet Story
Incase you have a Google Cloud Storage bucket you can also push images automatically to be ingested into GEE. Though this requires interaction with gsutil and starting ingestion function for each image. The GEE guide for image ingestion can be found here
5) Additional Tools and Toolboxes for Local Analysis
If you need to handle the data locally using Matlab, QGIS or ArcMap make sure you have these softwares installed. The images can then be downloaded and analyzed using multiple methods and toolsets. A lot of these softwares have additional capabilities to help you further use Planet data. You can find a better reference of external integration here