Google Takeout and Transfer: Tools and Guide for Code and Asset Transfer
![]()
![]()
Command Line Interface Allows you to copy all codes and assets from one Google account to another
Note: This is something that I have tested and have designed only for a windows machine with python 2.7.14 but can be easily ported into an different operating system. Use these tool and steps at your own risk and backup your scripts always just in case.
If you still want to proceed which I assume you do in case you are still reading, I am including descriptions links to the tool I made and the steps I used to achieve the same. The tool is a single command line interface with three sections.
Before you do this make sure of a few things
- Both your google accounts have an external password, since it requires that to download and perform a lot of the operations. Also enable __Let Less Secure App use your account_ on both these accounts._
- Your system has native python available in terminal or command prompt depending on what kind of system you are using. You can check this by typing
python --version - _Git is installed on your system. For windows you can find __installation here_
- _Earth Engine Command Line(earthengine cli) interface is installed, instructions are in the __developer page_
- _You have authenticated earthengine cli using _
earthengine authenticate - Make sure you visit the __git source for your account_ within earth engine and allow access._
- Check git is accessible via your system path type
git helpand check if the system can reach installed git command line tools.
Now we setup and install the tool by running the following set of steps. The Github repository containing this tool and codes can be found here
For windows download the zip here and after extraction go to the folder containing "setup.py" and open command prompt at that location and type
python setup.py install
pip install -r requirements.txt
Now call the tool for the first time, by typing in geetakeout -h. This will only work if you have python in the system path which you can test for opening up terminal or command prompt and typing **python**. If you want, you don't have to install the tool to use it you can browse to the folder geetakeout inside the main zipped folder. You can then call the tool by simple
python geetakeout.py -h
The housekeeping and credential setup is optional since most of you have probably installed the earthengine cli and authenticated it using **earthengine authenticate**.
> Anatomy of the Process: How to transfer step by step
Getting first things out of the way is to understand the three sections of this tool. To make life and this process simpler I designed the tool to have a flow so you can run these tools one after the other. The EE Setup and Housekeeping sections are optional , since I will generally updated the selenium driver for mozilla and it assumes you have authenticated your earthengine CLI . The tool might show an error if you have not authenticated using earthengine authenticate
If you have installed the tool run
geetakeout -h

If you have migrated into the folder
python geetakeout.py -h
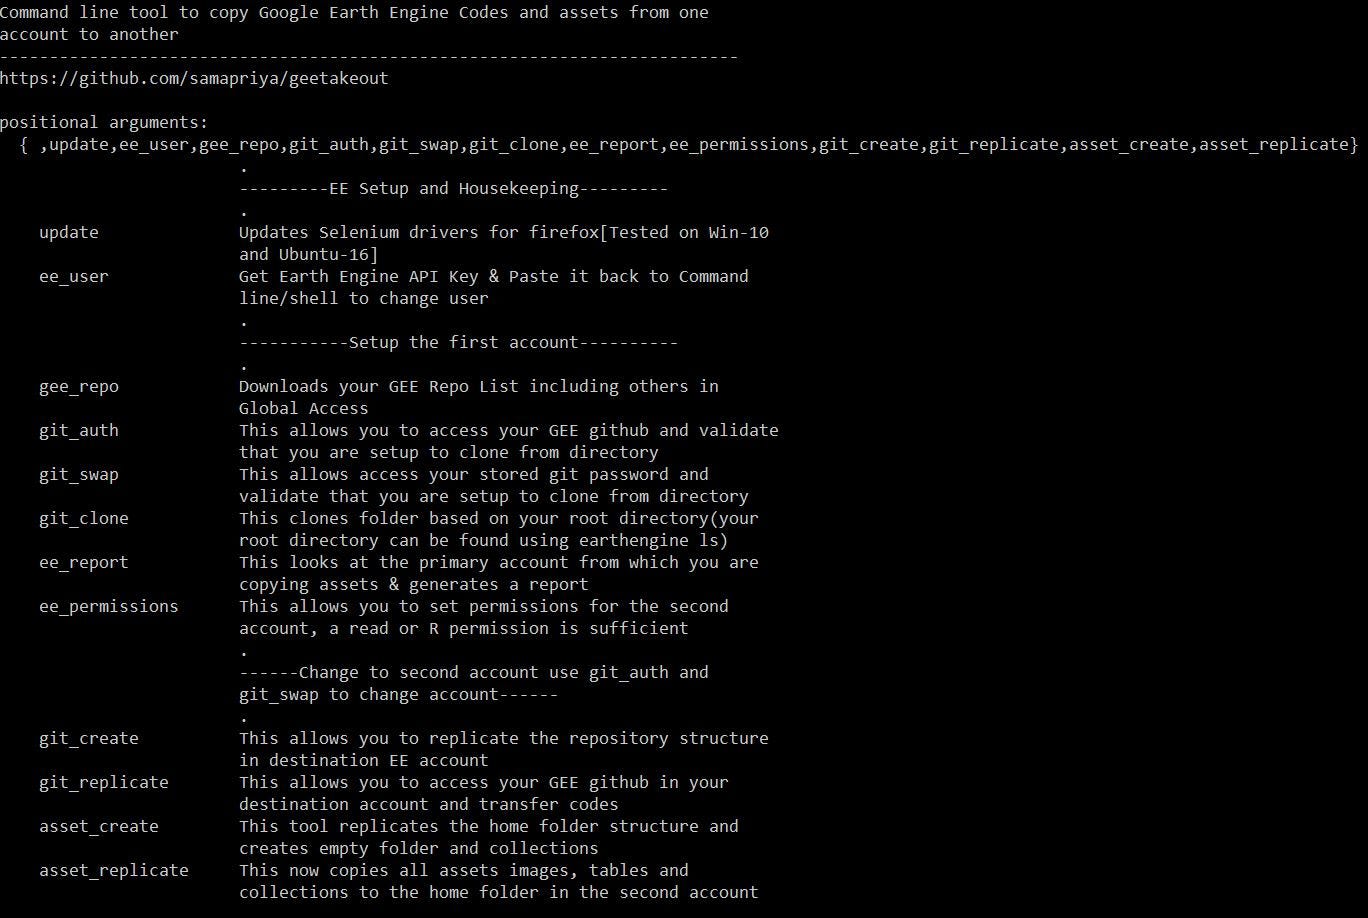
The GEE Takeout Tool CLI printout
Setting up the case study
For this blog I decided to make the transfer simple I have a university account but since my university if shifting umail services to a google app service it means my domain would change from @umail.iu.edu to @iu.edu which are separate accounts. I created the iu.edu GEE account recently.

Code Editor comparison Left(my @umail account and right my @iu account)
This also means that the root path for my home folder and repository are different. The idea is simple to be able to replicate the codes and assets from one account to the other. This includes every type if assets including collections but also making sure that the structure of the folders are same. That being said you will still have to change the home path in the codes but if the structure is same then only a single root-path changes.
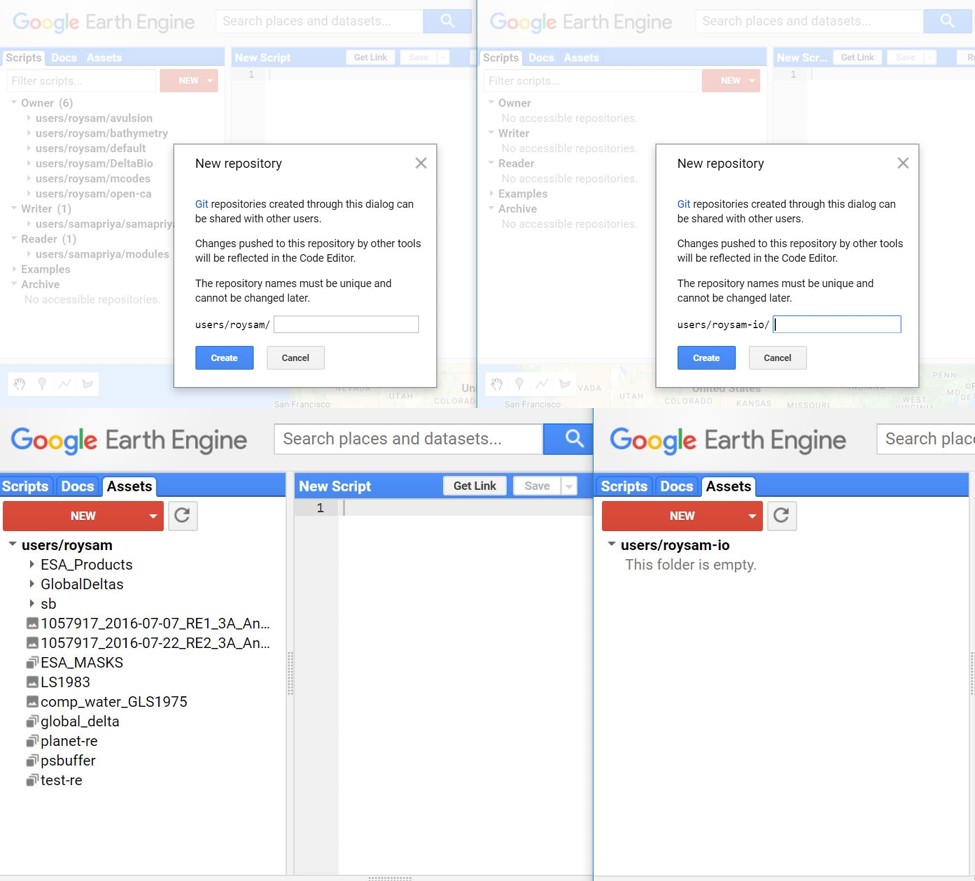
Comparing the root path and assets folder for both accounts
So now that we have a setup, I am going to approach it step by step and have a walk through to explain the process better.
Step 1: Getting your Repository Lists(gee_repo)
This assumes that you have visited the Git Source for your codes in Google Earth Engine and authorized it. If not allow it here and then you are set to download your repo contents and perform git operations. The tool is setup for accessing all repositories that are shared with you. This downloads the list into an html file which can then be parsed for your repositories.
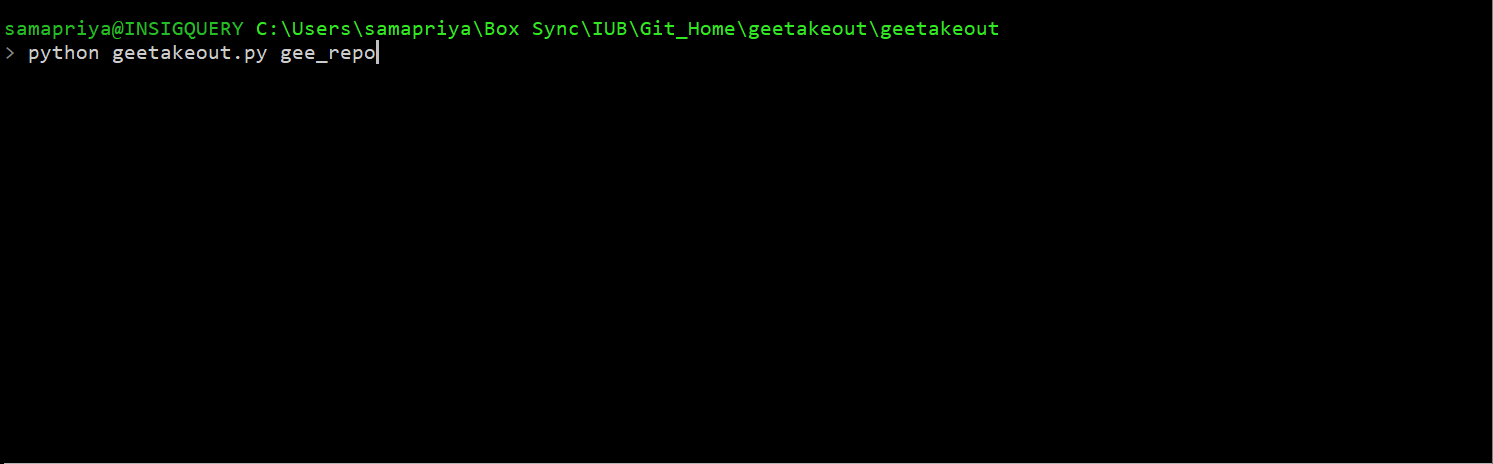
Create GEE Repo List
Step 2: Setting up your Git with Earth Engine Credentials(git_auth)
You can do this using two methods
- The first simple includes you visiting your gitsource account page that we accessed earlier and click
**Generate Password **and follow instructions.
I am going to talk more about the second method because this eliminates the need to get the password again and again since it is save as passkey. This will authenticate your git client with your git password using a browser less login and also store your gitkey
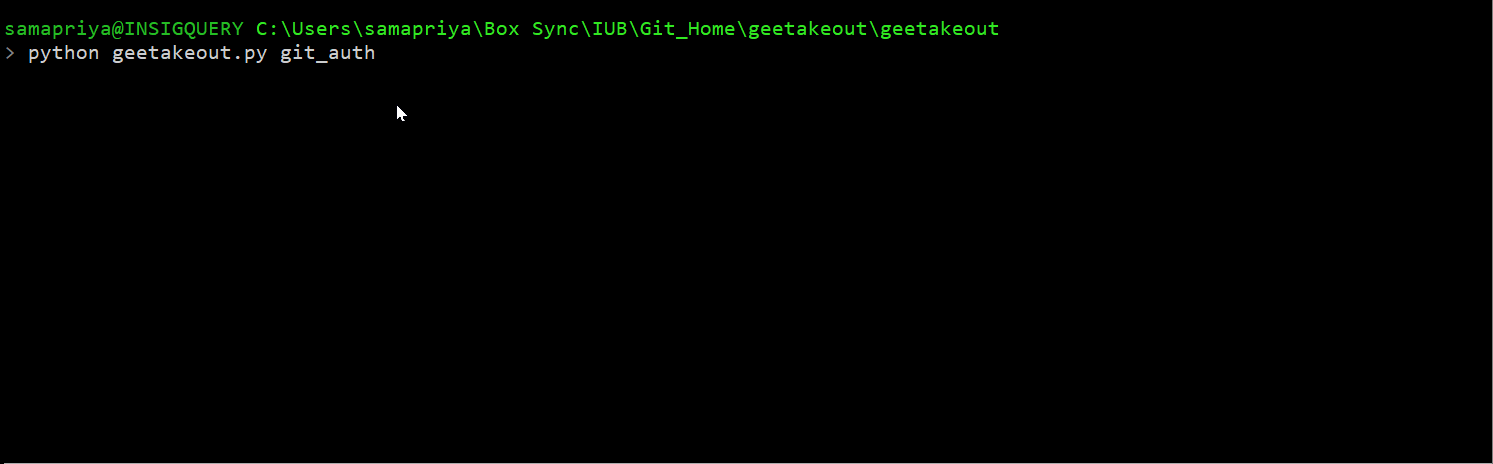
GIT Auth (saves git key)
We will use this again to setup our second account post authorization. This will print our gitkey location and make sure you copy that so you can swap in out as needed. Note the name of the key is in the format **git-"username"**** **in this case it is **git-roysam**
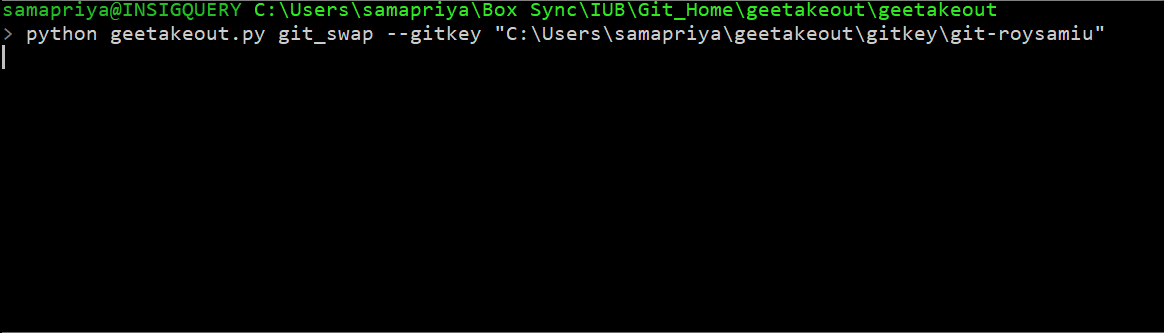
Step 3: Authorize your Git Client with Git Key(git_swap)
The next step is to use the saved gitkey to authorize the git client. We are setting everything up so that we can clone the repositories to which we have access.
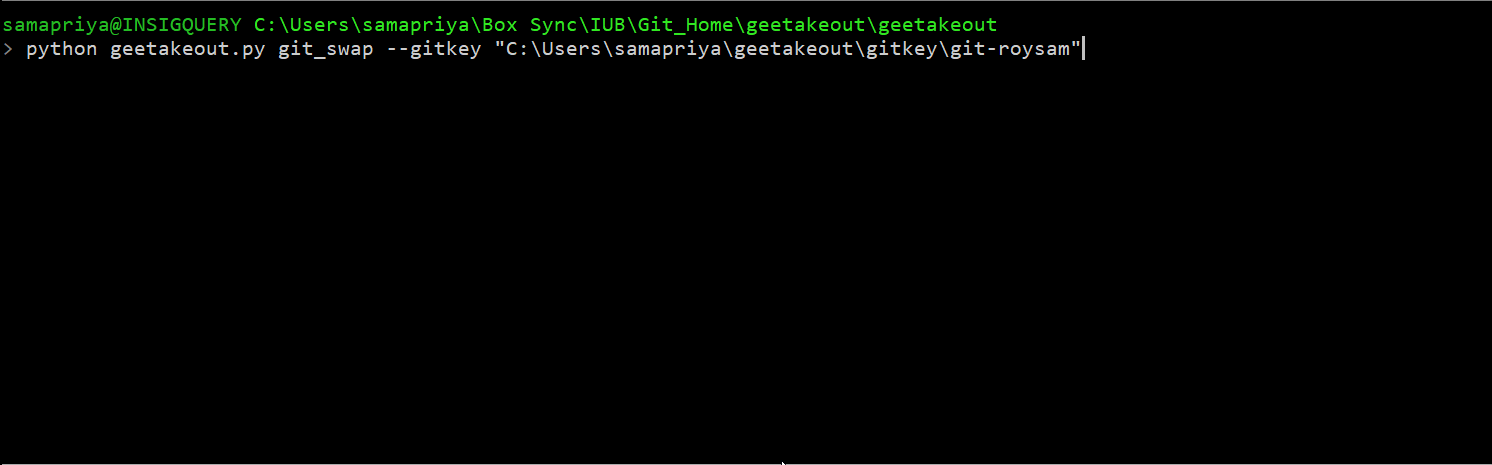
Authorize using the git key stored earlier
Step 4: Clone your repositories(git_clone)
This tool makes use of your earlier created GIT list, now that your git client has been authorized in step 2, you should be able to download your repos. This tool uses the account already linked to your terminal account. If you are not sure try **earthengine ls** to see your username. The export path is noted for the collection of repositories.
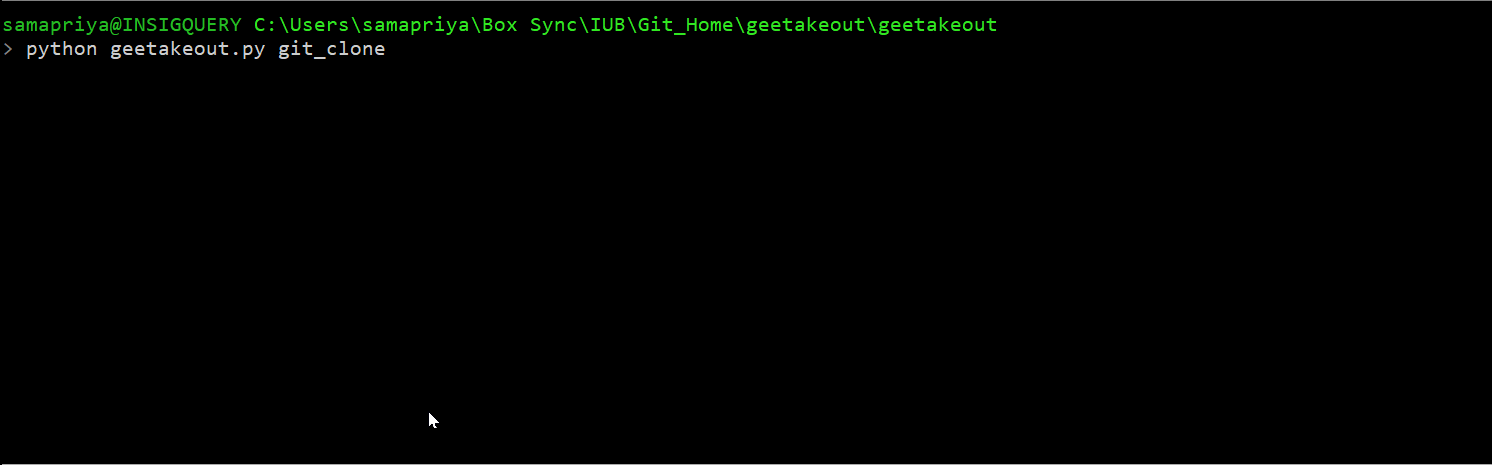
Cloning your Git Repositories
Step 5: Working with Assets: Generating Asset Report(ee_report)
This includes all your assets , including tables, images, image collections and folders. We need to make sure we have this list to work on copying over your assets to the secondary account. Running this is simple and just requires a location for the csv file (the full path).
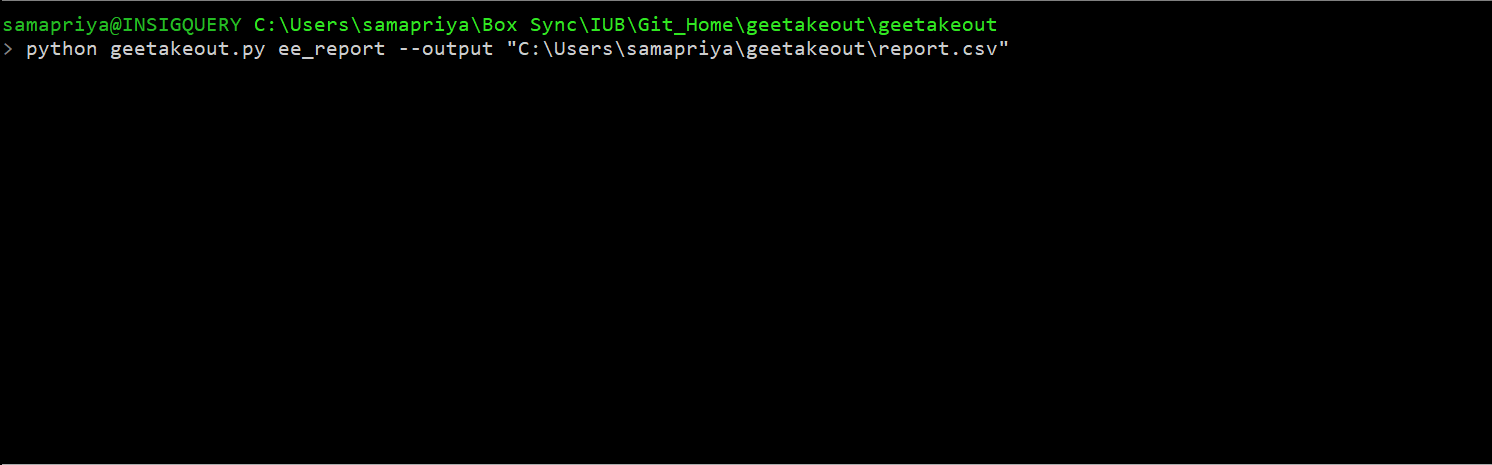
Running Earth Engine Reports
The output is a csv file consiting of the type of asset and the asset path to be replicated in the new account. And now that we have the list time to get permissions to copy these assets.
Step 6: Setting Permissions to Assets(ee_permissions)
We now use the report file generated to grant read access to all assets in your account. Once this is completed you will be able to copy your assets apart from being able to copy your codes.
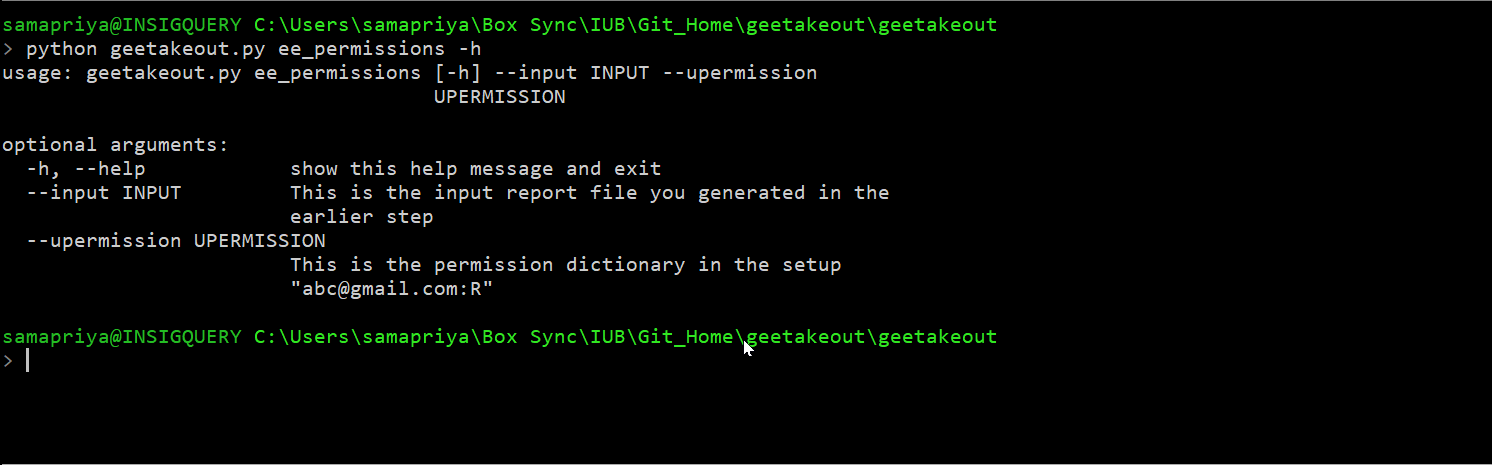
Getting permissions to assets
Let us Begin to Copy : We change gears and switch over to the destination account
Step 7: Setting up the Destination Account(ee_user and git_swap)
Now we have to do two steps one after the other, do a quick earthengine authenticate and authenticate to your new account and perform Step 2 and Step 3 this time using your new account. The tool **ee_user** will also allow you to change your accounts. I already created Step 2 for my secondary account and now I will use that to authorize my git client with the new account.
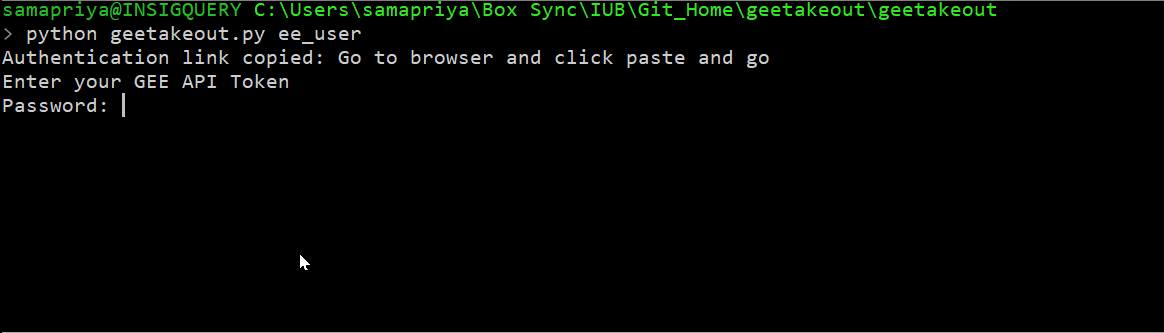
Change your earthengine authentication and also validate your git key
Now we authorized the git client with the second key
Step 8: Replicate Repositories (git_create)
To setup our new account we need to build the outline of the earlier account, the repolists and folders inside these repos and then similary the folders and empty collections in the secondary account.
Note: Git cannot push an empty repository so if you have an empty repository delete it before downloading and pushing to new account
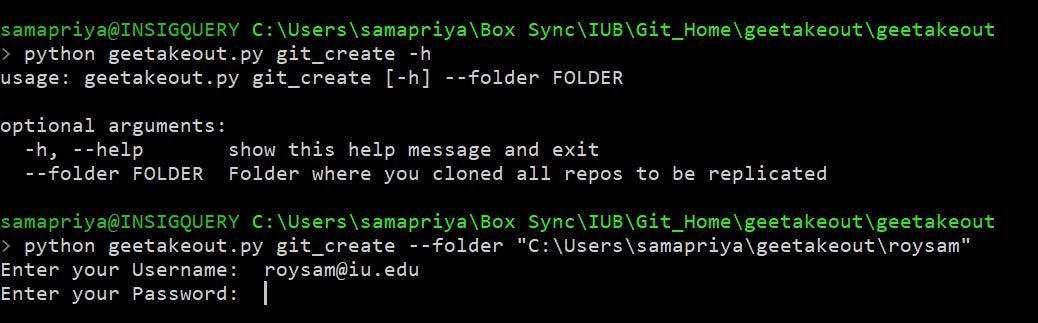
Git Create your folder based on your earlier account
The repo lists now look similar
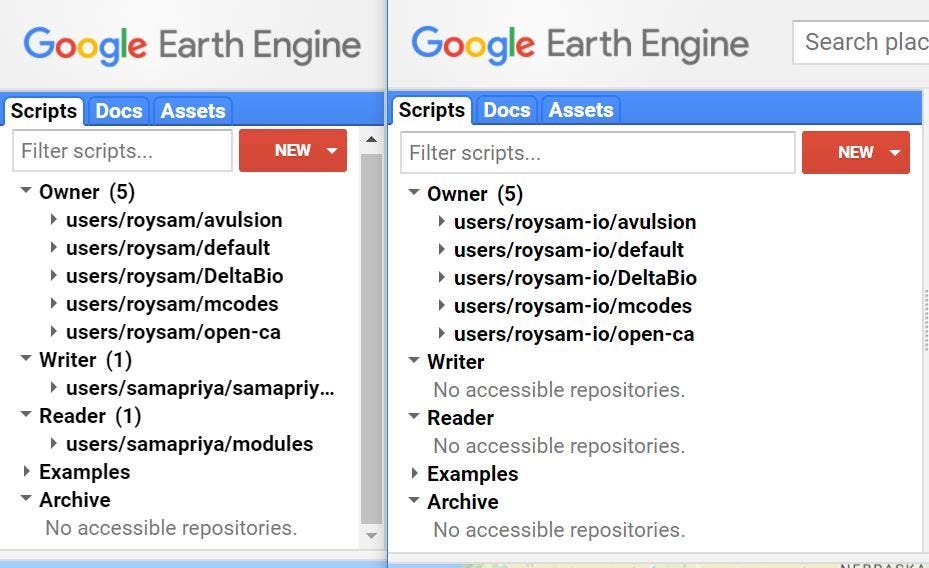
Repo created on secondary account
Step 9: Push to New Account(git_replicate)
Now we push all codes from our earlier account to our new account, this way our repositories will now be populated with the most recent codes.
"Do not push to any repository that already has code because this will overwrite it"
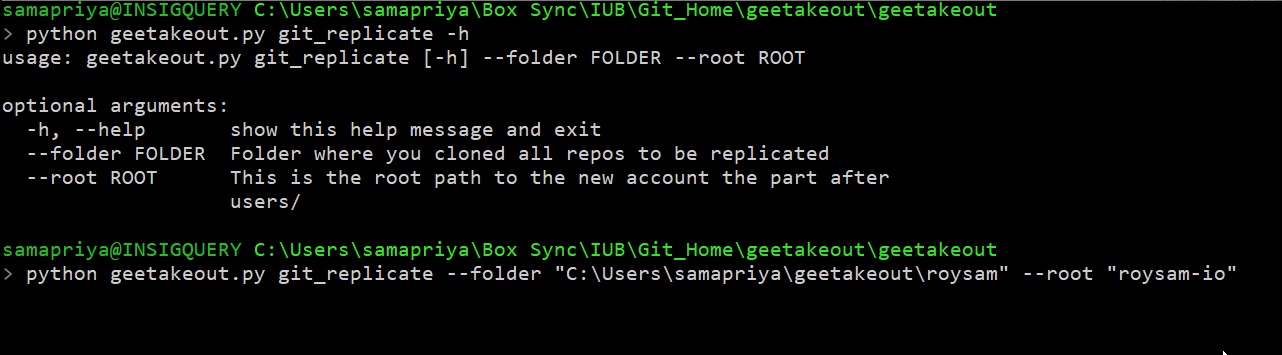
git_replicate to new account
Step 10: Replicate Asset Structure(asset_create) and Assets (asset_replicate)
This is similar to git_create here we replicate the collection and folder structure so we can push our assets to them. You pass it the original report you created from your primary account and it sets up as needed.
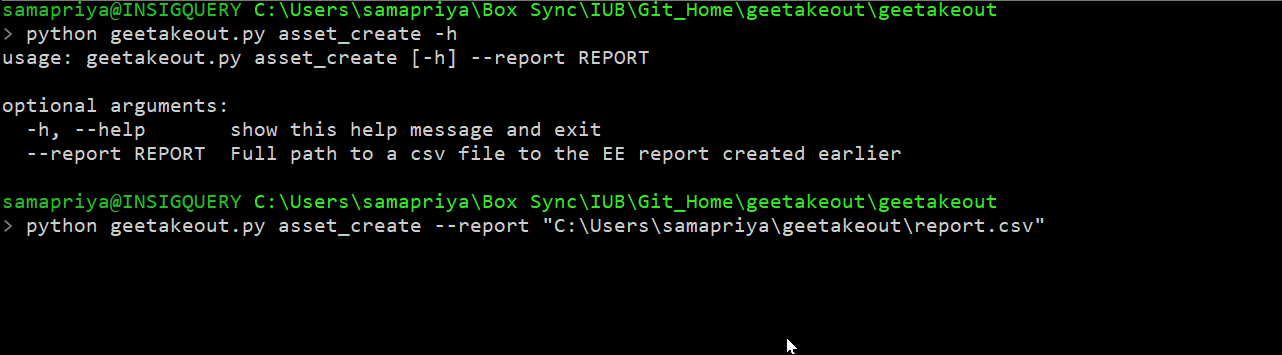
Creates asset structure (folders and collections)
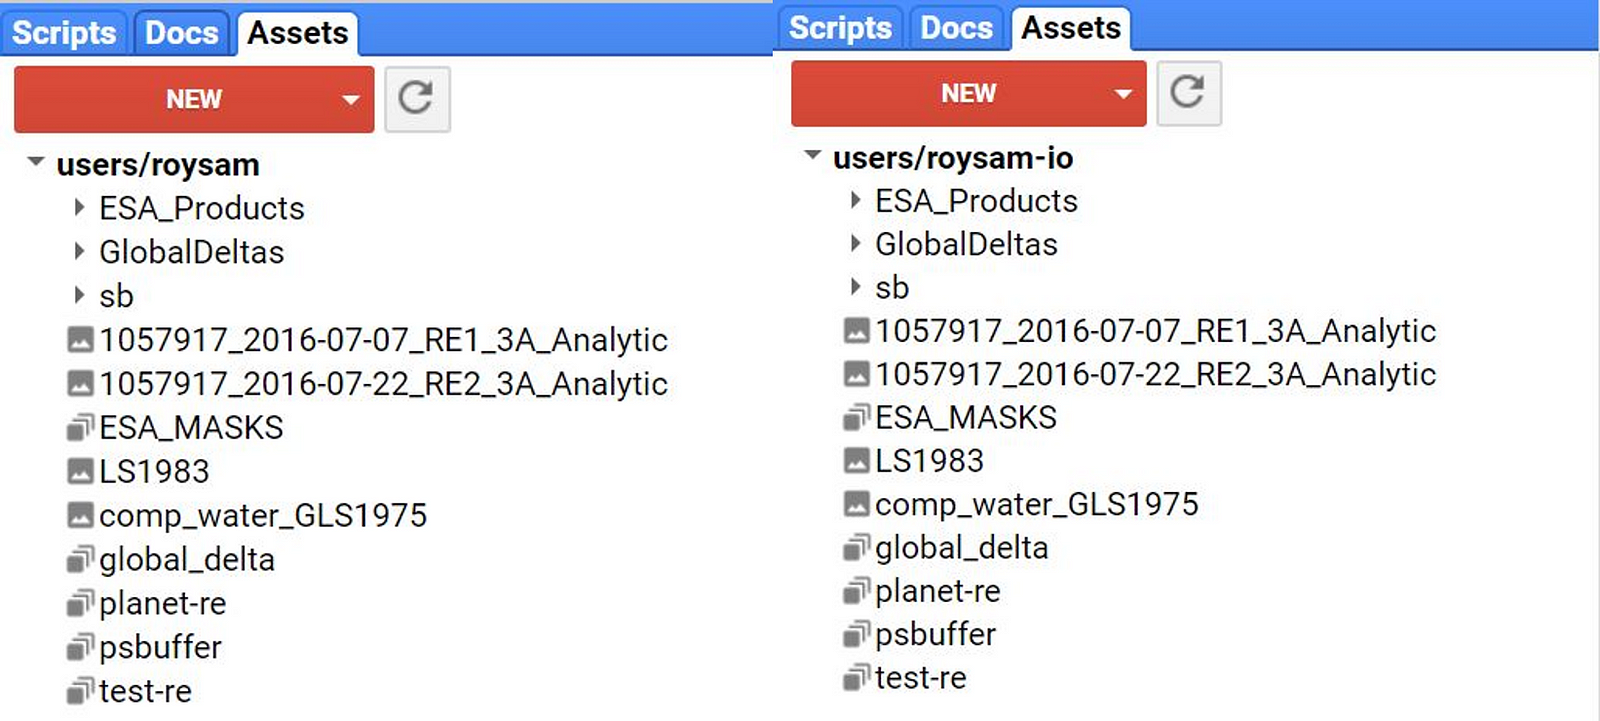
This has replicated the collection and Image folder structures.

Asset Collections and Folders have been created(Left: asset home before asset_create Right: asset home after asset_create)
However this is still empty and the last step makes sure that your assets are actually copied over to your new asset home. I have included a counter to measure transfers left incase it is a large collection.
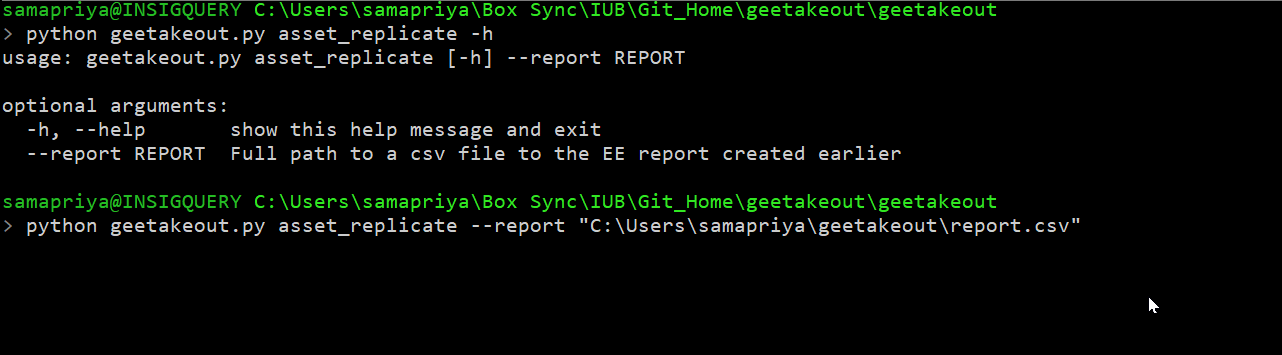
Asset Replication: Copying assets to your home folder
The final results is your assets and codes all copied, you will still have to edit codes to change your path as needed but for now we have replicated an Earth Engine account into a new location.
Replicated Assets on Both Accounts Copied from Left to Right
There you go, over the last 10 steps we have managed to replicate and move an earth engine account from one place to another. Though I found this useful to move accounts within a university setting, I see some value in moving accounts and replicating when a project member leaves a project or for simply migrating at large. For now if an owner of an account deletes his/her account or looses access to his/her account and even if you are a writer to the repository and the collection, you will loose access to these codes and assets. So this can aid in maintaining continuity by moving codes to more persistent account.
Though I have not tested this tools in a linux setting, these setup tools can be adapted and used easily in that framework, since I have tested the individual components in such setups.